Chameleon Documentation

I can't say enough great things about the Chameleon bootloader. One thing that I had some trouble finding at first was any documentation to accompany it. A lot of valuable information is supplied in the Doc folder if you download the source code of Chameleon RC3. Mostly it tells users how to set boot flags and advanced startup options to enable different functionality.

You can use these options from the Chameleon bootloader itself when starting up your machine. Stop the Chameleon countdown and type the command at the boot prompt. If you want any of the options to be selected by default, you must enter them into your com.apple.boot.plist- in your /Extra folder. Simply drag this file to the desktop, open and edit in TextEdit, then drag back to /Extra.

The following text is taken from the Chameleon documentation provided in the source folder available on http://chameleon.osx86.hu/ I edited and clarified where necessary.

The boot: prompt waits for you to type advanced startup options. If you don't type anything, the computer continues starting up normally. It uses the kernel and configuration files on the startup device, which it also uses as the root device.

Advanced startup options use the following syntax:
[device] [arguments]

Example arguments include:
device: rd= (e.g. rd=disk0s2)
device: rd=* (e.g. rd=*/PCI0@0/CHN0@0/@0:1)
kernel: kernel name (e.g. "mach_kernel" - must be in "/" )

flags:
-v (verbose)
-s (single user mode)
-x (safe mode)
-F (ignore boot configuration file)

"Graphics Mode"="WIDTHxHEIGHTxDEPTH"
(e.g. "1024x768x32")

kernel flags
(e.g. debug=0x144)

io=0xffffffff
(defined in IOKit/IOKitDebug.h)

Example:
mach_kernel rd=disk0s1 -v "Graphics Mode"="1920x1200x32"

If the computer won't start up properly, you may be able to start it up using safe mode. Type -x to start up in safe mode, which ignores all cached driver files.

Special booter hotkeys:
F5
Rescans optical drive.

F10
Scans and displays all BIOS accessible drives.

Special booter commands:
?memory
Displays information about the computer's memory.

?video
Displays VESA video modes supported by the computer's BIOS.

?norescan
Leaves optical drive rescan mode.

Additional useful command-line options:
config=
Use an alternate Boot.plist file.

Options useful in the com.apple.Boot.plist file:
Wait=Yes|No
Prompt for a key press before starting the kernel.

"Quiet Boot"=Yes|No
Use quiet boot mode (no messages or prompt).

Timeout=8
Number of seconds to pause at the boot: prompt.

"Instant Menu"=Yes
Force displaying the partition selection menu.

"Default Partition"=hd(x,y)
Sets the default boot partition,Where 'x' is the disk number, 'y' the partition number.

GUI=No
Disable the GUI (enabled by default).

"Boot Banner"=Yes|No
Show boot banner in GUI mode (enabled by default).

"Legacy Logo"=Yes|No
Use the legacy grey apple logo (disabled by default).

GraphicsEnabler=Yes|No
Automatic device-properties generation for graphics cards.

VideoROM=
Use an alternate ROM image (default path: /NVIDIA.ROM).

VBIOS=Yes|No
Inject VBIOS to device-properties.

EthernetBuiltIn=Yes|No
Automatic "built-in"=yes device-properties generation for ethernet interfaces.

USBBusFix=Yes
Enable the EHCI and UHCI fixes (disabled by default).

EHCIacquire=Yes
Enable the EHCI fix (disabled by default).

UHCIreset=Yes
Enable the UHCI fix (disabled by default).

Wake=No
Disable wake up after hibernation (enbaled by default).

ForceWake=Yes
Force using the sleepimage (disabled by default).

WakeImage=
Use an alternate sleepimage file. (default path is /private/var/vm/sleepimage).

DropSSDT=Yes
Skip the SSDT tables while relocating the ACPI tables.

DSDT=
Use an alternate DSDT.aml file. (default path: /DSDT.aml /Extra/DSDT.aml)

SMBIOS=
Use an alternate smbios.plist file. (default path: /smbios.plist /Extra/smbios.plist bt(0,0)/Extra/smbios.plist).

SMBIOSdefaults=No
Don't use the Default values for SMBIOS overriding. If smbios.plist doesn't exist, factory values are kept.

"Scan Single Drive"=Yes|No
Scan the drive only where the booter got loaded from. Fix rescan issues when using a DVD reader in AHCI mode.

Rescan=Yes
Enable CD-ROM rescan mode.

"Rescan Prompt"=Yes
Prompts for enable CD-ROM rescan mode.

I hope this helps clear up some questions you might have had about using Chameleon!


For discussions on this and other topics, register today at tonymacx86.com!

Enable the Apple Boot Screen


By default, the installation guides on this site put the -v (verbose) boot flag into your com.apple.boot.plist that is located in /Exra. The reason I did this is so that you can watch as the system boots and debug. If you are done with tinkering with kexts, and have your system running 100%, you may want your Hackintosh to look more like a real Mac starting up. Simply drag your com.apple.boot.plist to the desktop, open it in TextEdit and remove the -v flag from the Kernel Flags string. Then put the file back into /Extra and reboot.

NOTE: By default, Chameleon uses an updated shiny Apple logo. To make the boot screen look like the above photo, insert the string Legacy Logo=Yes into your com.apple.boot.plist.

TO SET/CHANGE RESOLUTION: Add your desired resolution to your /Extra/com.apple.boot.plist:


For discussions on this and other topics, register today at tonymacx86.com!

Dual Boot Windows 7 and OS X Snow Leopard Using Chameleon

Using Chameleon as your bootloader, you can boot an infinite amount of operating systems on your PC. It's simple to use a separate hard drive for each operating system.
  1. Install multiple operating systems on separate hard drives.
  2. Go to CMOS Setup Utility and choose Advanced BIOS Features.
  3. Select Hard Disk Boot Priority.
  4. Move your Chameleon OS X hard drive to top of list.
  5. Boot into Chameleon and choose your Operating System.
The following guide will show you how to put OS X Snow Leopard and Windows 7 on the same hard drive. You can then use Chameleon to select either Snow Leopard or Windows 7 at boot time. It's a bit trickier, as the Windows installer will set itself as the active partition automatically. You have to manually set the OS X partition active at the end of the process.   UPDATE: The latest MultiBeast will take care of choosing boot0hfs instead of boot0 to automatically boot from hfs partition, even if it's inactive.  

STEP 1: PREPARING THE DRIVE
First thing to do is format and partition the hard drive. When you choose 2 partitions with a GUID Partition Table, OS X will format the drive with 3 partitions. Partition 1 is EFI, Partition 2 will be Snow Leopard and Partition 3 will be Windows 7. The EFI partition is a very small (200mb) hidden partition that holds the OS X bootloader and BIOS information on a real Mac. In a separate guide, I'll show you how to install Chameleon to the EFI partition to leave an OS X install untouched. For now, just know it's installed by default and labeled Partition 1.
  1. Boot into your existing OS X installation.
  2. Open Applications/Utilities/Disk Utility
  3. Select your hard drive in the left column.
  4. Click the Partition tab
  5. Under Volume Scheme: separate your hard drive into 2 Partitions. You can make them any size you want.
  6. Click Options... choose GUID Partition Table, then click OK.
  7. Click Untitled 1. Under Name: type Snow Leopard. Under Format: choose Mac OS Extended (Journaled).
  8. Click Untitled 2. Under Name: type Windows 7. Under Format: choose MSDOS (FAT).
  9. Click Apply and close Disk Utility.
  10. Insert Windows 7 DVD in tray.
  11. Unplug all hard drives except this one and reboot.
STEP 2: INSTALL WINDOWS 7
Now you will install Windows 7 to Partition 3. You'll have to reformat it to NTFS in the Windows 7 installer before Windows will let you install. We labeled it Windows 7 in the previous step.
  1. Wait for Windows to begin installation process.
  2. Accept license agreement.
  3. At Which type of installation do you want, choose Custom (Advanced)
  4. At Where do you want to install Windows, choose Partition 3: Windows 7.
  5. Click Drive options (advanced).
  6. Click format.
  7. Click OK.
  8. Click Next.


At this point, Windows 7 will install to Partition 3. The installer will reboot the computer a few times- just leave it until you complete the installation process and see the Windows desktop.

STEP 3: INSTALL SNOW LEOPARD
The next step is to install Snow Leopard to Partition 2.

iBoot + MultiBeast - Install OS X on any Intel-based PC

STEP 4: SET THE OS X PARTITION AS ACTIVE (NOT NECESSARY)  UPDATE: The latest MultiBeast will take care of choosing boot0hfs instead of boot0 to automatically boot from hfs partition, even if it's inactive.  

You now have to set the Snow Leopard partition so that your computer boots from it first. Therefore, Chameleon loads and you can select either Snow Leopard or Windows 7. You will have to issue a few commands to Terminal in order to accomplish this task.
  1. Open Applications/Utilities/Terminal.
  2. Type diskutil list
  3. Write down the IDENTIFIER of your Apple_HFS Snow Leopard drive. For this example: disk0s2.
  4. Type sudo -s
  5. Enter your password.
  6. Type fdisk -u /dev/rdisk0 
  7. Type y
  8. Type fdisk -e /dev/rdisk0
  9. Type p
  10. Type f 2
  11. Type w
  12. Type y
  13. Close Terminal and reboot.
Unplug all drives except the dual boot drive and restart. You should now be able to boot directly into Chameleon, stop the boot countdown and select either Snow Leopard or Windows NTFS as shown in the picture below.


Thanks for reading and I hope it worked for you! Special thanks goes out to the entire OSx86 Hackintosh community! This guide was cobbled together from various sources- I did not invent this method, and do not wish to take any credit beyond putting it into plain English. ;) As always, if you have any issues, post a comment and I'll try my best to help you out any way I can.

-tonymacx86

For discussions on this and other topics, register today at tonymacx86.com!

Create a Chameleon Boot USB Drive

A good thing to have if you're updating or changing your Hackintosh is a Chameleon boot USB drive. It is a USB drive or key that has nothing on it but the Chameleon bootloader- therefore it can be a cheap 512mb or 1gb drive! You can always boot directly from it in case your install or update doesn't work.
  1. Boot into your existing OS X Installation.
  2. Insert your USB drive.
  3. Open Applications/Utilities/Disk Utility.
  4. Highlight your USB drive in the left column.
  5. Click the Partition Tab.
  6. Click Volume Scheme- choose 1 Partition.
  7. Click Options…
  8. Select GUID Partition Table. Click OK.
  9. In the Name: field type: ChameleonBoot
  10. In Format: field select Mac OS Extended (Case Sensitive, Journaled)
  11. Click Apply, then click Partition.
  12. Close Disk Utility
  13. Download tonymacx86-snowleopard.zip
  14. Open and place tonymacx86-snowleopard folder on the desktop.
  15. Open Apps folder
  16. Open PC EFI 10.1
  17. Select ChameleonBoot and click Continue.
  18. Click Install, and then type your password.
  19. Open Terminal.
  20. Type: sudo rm /Volumes/ChameleonBoot/boot and type your password. (this deletes the boot file installed from PC EFI 10.1)
  21. Click and drag boot, DSDT.aml, and Extra from tonymacx86-snowleopard to ChameleonBoot. Or drag your own files from your existing Snow Leopard drive.
That's it- the drive is done. Just set your BIOS Hard Disk Priority to boot from USB first. Hope this helps!

For discussions on this and other topics, register today at tonymacx86.com!

How To Install Chameleon Manually From Terminal

There are various pkg installers to install Chameleon to your boot drive through a GUI. You may find it necessary to replace your Chameleon with a new version. Usually, if you have previously installed Chameleon 2.0, all you must do is replace the boot file. But if you want to replace the entire thing, or if installing for the first time, there are a few simple Terminal commands you must issue.


1. Download any Chameleon binary source (For this example: Chameleon-2.0-RC2-r640-bin)
2. Unzip the folder and place it on the desktop as shown in the picture.
2. Open Applications/Utilities/Terminal
3. Type: diskutil list
4. Locate your OS X installation partition. It will be under IDENTIFIER. Be sure to use the correct one. (For this example: disk0s2)
5. Type: cd
6. Click and drag the Chameleon folder to Terminal, creating a path to it. This is a cool trick that you can use instead of typing the whole path. The command will become: cd /Users/****/Desktop/Chameleon-2.0-RC2-r640-bin
7. Type cd i386
8. Type: sudo fdisk -f boot0 -u -y /dev/rdisk0
9. Type: sudo dd if=boot1h of=/dev/rdisk0s2 (your disk IDENTIFIER from step 4)
10. Type: sudo cp boot /

That's it! If you want to use a different boot file (like PC EFI 10.5), you must delete the installed boot file and drag the new one to the root of your drive. Here's how to do that:

1. Open Applications/Utilities/Terminal
2. Type: sudo rm /boot
3. Drag new boot file to your install drive.

I hope this helps you become more familiar with the Terminal! Good luck with your manual installation of Chameleon!


For discussions on this and other topics, register today at tonymacx86.com!

OSx86 Help Desk

Hey everyone-

Just thought I'd create a post where you can come with your questions about anything OSx86 related. Post specific issues, install problems, screenshots, etc... I'll try my best to help you out any way I can!

The OSx86 Help Desk- working to answer your questions- for free, for fun, for you!

;)

EDIT: The OSx86 Help Desk is now moved to the forum!

For discussions on this and other topics, register today at tonymacx86.com!

Alternate Guide #1 – OS X Snow Leopard Install using Retail DVD

NOTE: This guide is not current anymore: iBoot + MultiBeast is the recommended method for installation. 

Here is a second guide to install OS X on your computer using the Snow Leopard Retail DVD. It is more generic, and not system-specific, meaning you can use this guide for any PC that can run the Vanilla 10.6.2 kernel. It also loads the system directly without using any booted installer.

However, this guide does not enable sound or ethernet by default. Also, you will have to compile your own DSDT.aml, at least to stop the system from resetting your CMOS at each restart. Therefore, it can be much more complicated- you may run into trouble if this is your first attempt. I didn't include BIOS photos in this post, but you can refer to the previously posted guide for general BIOS settings. This guide is inspired by Prasys’ guide and ori0’s solution posted in comments.

What you need:

  1. A Snow Leopard Mac OS X Install DVD
  2. A Mac or Working Hackintosh running OS X Leopard or Snow Leopard
  3. If using a Mac an external hard drive enclosure or adapter
STEP 1: PREPARE SNOW LEOPARD HARD DRIVE
You need to format your destination hard drive (Snow Leopard) to accept the installation. I strongly recommend using a SATA drive.

  1. Open Applications/Utilities/Disk Utility.
  2. Highlight the hard drive you want to use as the destination for your Snow Leopard Install in the left column.
  3. Click the Partition Tab.
  4. Click Volume Scheme- choose 1 Partition.
  5. Click Options…
  6. Select GUID Partition Table. Click OK.
  7. In the Name: field type: Snow Leopard
  8. In Format: field select Mac OS Extended (Journaled).
  9. Click Apply, then click Partition.
  10. Close Disk Utility.
  11. Right click on Snow Leopard in Finder or Desktop. Choose Get Info.
  12. In the lower right corner, click the lock icon open, type your password and un-check Ignore Ownership on this Volume checkbox. Click the lock icon closed.
STEP 2: MOUNT MAC OS X INSTALL DVD OR .DMG
In this step, we will install Snow Leopard directly to the hard drive without rebooting into any installer.
  1. In the menu bar of Finder, select Go to Folder…
  2. Type or copy & paste /Volumes/Mac OS X Install DVD/System/Installation/Packages/
  3. Double-click OSInstall.mpkg
  4. Click Continue three times, then Agree, select Snow Leopard, then click Customize…
  5. Uncheck all Optional Installs. (If you need anything else, you can install it later.)
  6. Click Install.
OS X will now install directly to your destination drive!


STEP 3: UPDATE SNOW LEOPARD TO 10.6.2
As of 10.6.2, and the release of the i5/i7 iMac, OS X Snow Leopard supports P55 based systems. The update will install the 10.2.0 Vanilla Kernel, as well as a host of security and stability fixes. Details are available on Apple’s website.
  1. Download the Mac OS X 10.6.2 Combo Update here:
  2. http://www.apple.com/downloads/macosx/apple/macosx_updates/macosxv1062updatecombo.html
  3. Mount MacOSXUpdCombo10.6.2.dmg
  4. Click Continue three times, then Agree, then Change Install Location…, select Snow Leopard, then Continue, then click Install and type your password.
  5. Install MacOSXUpdCombo10.6.2.pkg
NOTE: If 10.6.2 will not install, replace the mach_kernel with Qoopz Voodoo kernel for 10.6.0 & 10.6.1. For details, see step 8 in the original guide.


STEP 4: INSTALL BOOTLOADER TO SNOW LEOPARD DRIVE
In this step you will install the Chameleon bootloader to your Snow Leopard hard drive.

  1. Download tonymacx86-snowleopard.zip.
  2. Open Apps folder
  3. Open PC EFI 10.1
  4. Click Continue, then Change Install Location…
  5. Select Snow Leopard and click Continue.
  6. Click Install, and then type your password.

STEP 5: COPY NECESSARY FILES TO SNOW LEOPARD DRIVE
In this step, you will copy the boot file and Extra folder from tonymacx86-snowleopard to Snow Leopard.
  1. Open Applications/Utilities/Terminal
  2. Type: sudo rm /Volumes/Snow Leopard/boot and type your password. (this deletes the boot file)
  3. Close Terminal.
  4. Set up Windows as shown in the photo.
  5. Click and drag boot and Extra from tonymacx86-snowleopard to Snow Leopard. (You may also use DSDT.aml if you have a GA-P55M-UD2 or compatible board.)
  6. Delete LegacyHDA_ALC888B.kext from /Extra/Extensions. (You may use this kext if you have a GA-P55M-UD2 or compatible board.)
  7. Delete Extensions.mkext from /Extra. (You may use this kext if you have a GA-P55M-UD2 or compatible board.)
  8. Download DSDTSE from here
  9. Click and drag tonymacx86-snowleopard and DSDTSE to Snow Leopard.


STEP 6: FIRST BOOT
The first boot of your new Snow Leopard install will show you a video and then lead you through a standard OS X setup routine for a new Mac.
  1. Complete the OS X setup routine.
  2. When you get to the desktop, restart the computer. This helps set initial boot caches.
  3. NOTE: Upon this reboot, your CMOS will reset to default settings. You will have to set up your CMOS settings again, as you do not have any DSDT.aml yet.
STEP 7: CREATE AND EDIT YOUR OWN DSDT.AML
Create, edit, and modify your DSDT as shown in the post below. This will rectify the CMOS reset issue.
http://tonymacx86.blogspot.com/2009/11/create-and-modify-your-dsdtaml.html

STEP 8: ENABLE SOUND, GRAPHICS, AND ETHERNET
The system should be set up for most nVidia graphics cards and some ATI cards automatically. Your com.apple.boot.plist located in /Extra contains the boot flag GraphicsEnabler=Yes. There are many ways to get sound, graphics and ethernet working. You may install one or more of the kexts to your system System-Library-Extensions in the tonymacx86-snowleopard folder in the following way. Or if the supplied kexts do not work, check kexts.com for more downloads.

  1. Open tonymacx86-snowleopard.
  2. Drag *.kext from System – Library – Extensions into Kext Helper b7.
  3. Type your password and click EASY INSTALL.
  4. Close Kext Helper b7.
  5. Open Snow Leopard drive.
  6. Drag /Extra/Extensions folder onto Kext Utility application.
  7. Drag /System/Library/Extensions folder onto Kext Utility application.
  8. Open Applications/Utilities/Disk Utility
  9. Highlight Snow Leopard in the left column.
  10. Click Repair Permissions.
  11. Restart computer.
YOU’RE DONE!
You should now have a working Hackintosh running 10.6.2 Snow Leopard with the 64-bit kernel enabled! Special thanks to the entire OSx86 community! This guide was cobbled together from various sources- I did not invent this method, and do not wish to take any credit beyond putting it into plain English. ;)

Feel free to post any issues or comments- I'll try to help out any way I can.

-tonymacx86

PS:
If you want to enable the Apple Boot Screen on startup, read this post:
http://tonymacx86.blogspot.com/2009/11/enable-apple-boot-screen.html

For discussions on this and other topics, register today at tonymacx86.com!

Create and Modify Your DSDT.aml

NOTE: As of the latest bios revisions by Gigabyte, the CMOS reset is now fixed.   (2010-05)

Using a DSDT (Differentiated System Description Table) is a necessity for running Snow Leopard on P55 boards. In the simplest of terms, it is a file that you place at the root of your system to tell OS X how to locate and enable features of your computer without checking your BIOS. For further details on what it is and how it works, check out http://wiki.osx86project.org/wiki/index.php/DSDT

You can tweak your system in all sorts of ways by changing lines of code in the DSDT.aml file. Unfortunately, you can't just open this file in TextEdit. From OS X, you must extract your DSDT.aml, convert it to DSDT.dsl, then edit it, then recompile it to DSDT.aml. To make it easy, the good folks from the EvOsx86 Team have made DSDTSE, a GUI application that allows you to do all of this in one convenient editor.

Using what I've learned from many OSx86 gurus, I will show you how to edit your DSDT.aml to allow your system to restart without clearing your CMOS. Other fixes are available for P55 boards as well- I have used the HDEF and USB fixes for my DSDT.
  1. Open DSDTSE. You can download the application from here. This can be tricky- the application sometimes doesnt allow you to open it. Try opening it from a few different locations- I use my external drive.
  2. Under Tools, choose Extract DSDT. The Editor will open with your DSDT.dsl all ready to edit.
  3. Under ACPI search, type _WAK and click search. You should come to a line that looks like this:
  4. Method (_WAK, 1, NotSerialized)
  5. First you must apply the code that allows hacks. Under DSDT hacks in the Main pane menu, select option 1: Method DTGP. Select all of the code at the top of the page. Copy/paste the entire block of code as shown into the editor directly before the _WAK line with a space in between at the beginning and end. Be sure to keep all spacing exactly as it was or the file will not compile and your hack may not work.
  6. Next, we will apply the code that will prevent the CMOS reset. Under ACPI search, type (RTC) and click search. You should come to a line that looks like this:
  7. Device (RTC)
  8. All you have to do here, is change the length of the IO segment in the code below from 0x04 to 0x02. There may be 2 places to make this change- change both.
  9. Under File, click Compile DSDT. The editor will prompt you to Save the file, save it to the default location.
  10. Open /Library/Application Support/EvOSoftware/DSDT/DSDTFiles/dsdt.aml
  11. Drag dsdt.aml to your install drive in Finder. Rename it DSDT.aml.
You're done! You now have a system-specific DSDT.aml file that will prevent your P55 system from resetting the CMOS at each boot. The process can be tricky, but this guide should help to make it a bit easier. Special thanks to Stellarola from the Insanelymac boards for discovering this fix! And to netkas for posting it to his blog.

For discussions on this and other topics, register today at tonymacx86.com!

PC EFI v10.5 Compiled for P55- ATI Users Rejoice!

Hey all-

I just did a bit of research, and managed to compile netkas' PC EFI v10.5 to work with P55 boards. It was rather easy- it was 1 line of code changed in the freq_detect.c file.

I just updated tonymacx86-snowleopard.zip with the boot file.

This solves the 'system running too fast' issue, that was previously solved by a modified i5boot. PC EFI 10.5 is the latest and greatest Chameleon variant with many fixes and features not included in the official Chameleon RC3 release. For more information check out netkas' blog.

This change shouldn't affect my guides at all, and it will enable ATI users to use GraphicsEnabler=y boot flag to enable their cards! The fix also works for most nVidia cards. I updated the zip file to include this flag by default- now there is no need for NVEnabler 64.kext unless you're having issues with TV-out. I am still testing this issue, and will update the guide accordingly.

How to compile a patched Chameleon boot file for P55 boards.
EDIT: This guide is no longer necessary, as Chameleon RC4 now supports this fix by default.
1. Download any Chameleon source.
2. Open the folder i386/libsaio, and the file freq_detect.c in TextEdit
3. Type Command-F and find the word Nehalem
4. Delete this line of code:
if (cpu_family == 0x06 && cpu_model == 0x1a)
5. Add this line of code:
if (cpu_family == 0x06 && (cpu_model == 0x1a || cpu_model == 0x1e))
6. Open Applications/Utilities/Terminal
7. Open path to Chameleon folder
8. Type make clean
9. Type make embedtheme
10. If it compiled correctly, your patched boot file will be located in /sym/i386 :)

For discussions on this and other topics, register today at tonymacx86.com!

OS X Snow Leopard Install using Retail DVD For P55 Motherboards and Intel Core i5 and i7

NOTE: This guide is not current anymore: iBoot + MultiBeast is the recommended method for installation.

The following is not meant to be a definitive method for installing OS X on PC hardware. There are many methods, but this one allows you to install OS X on your P55 computer build using the Snow Leopard retail DVD. Also, it works every time, unlike other methods I have tried. I tailored the install method specifically for my computer, a Gigabyte P55M-UD2 motherboard with an Intel Core i5 750 processor, 4gb of G.Skill Ripjaws 1600 RAM and a Sparkle nVidia GeForce 9400 GT 1GB graphics card. Most likely the method will work for any P55 build, but you’ll have to modify which kexts you use for graphics, etc…

At the end of this guide, you will have a fully stable and functional P55 Hackintosh running OS X Snow Leopard 10.6.2 running the 64-bit Vanilla Kernel. All included kexts are 64-bit ready. The only thing that will not be enabled by default is system sleep. To enable sleep after your install, follow this guide: Advanced DSDT Fixes: Enable Sleep on P55 Motherboards

NOTE: This guide assumes you have access to a working OS X install- the fastest and easiest way to get the job done.

What you need:
  • A Mac or Working Hackintosh running OS X Leopard or Snow Leopard
  • If using a Mac an external hard drive enclosure or adapter
  • A Snow Leopard Mac OS X Install DVD
  • A USB stick 8gb or larger, or a USB hard drive
  • Patience and humility- it may not work out perfectly the first time, but you will learn from your mistakes, and with enough tenacity the promised land can be reached.
STEP 1: PREPARING THE USB DRIVE
In this step, we must prepare a USB Drive to act as an installer for OS X. You may have installed an operating system before using a DVD. This is similar to installing using a DVD, but instead of the computer starting up and booting the DVD, it will start up and boot directly into an external USB drive with your modified OS X Installer DVD copied onto it.
  1. Boot into your existing OS X Installation.
  2. Insert your USB drive that you intend to use for booting the installer.
  3. Open Applications/Utilities/Disk Utility.
  4. Highlight your USB drive in the left column.
  5. Click the Partition Tab.
  6. Click Volume Scheme- choose 1 Partition.
  7. Click Options…
  8. Select GUID Partition Table. Click OK.
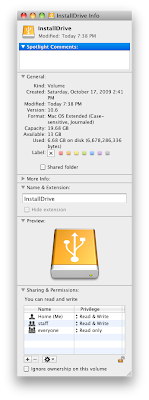
  9. In the Name: field type: InstallDrive
  10. In Format: field select Mac OS Extended (Case Sensitive, Journaled)
  11. Click Apply, then click Partition.
  12. Right click on InstallDrive in Finder or Desktop. Choose Get Info.
  13. In the lower right corner, click the lock icon open, type your password and un-check Ignore Ownership on this Volume checkbox. Click the lock icon closed.
  14. Insert Mac OS X Install DVD or mount Mac OS X Install DVD.dmg
  15. Switch back to Disk Utility.
  16. Highlight InstallDrive in the left column.
  17. Click Restore.
  18. Right click on Mac OS X Install DVD and choose Set as Source.
  19. Right click on InstallDrive and choose Set as Destination.
  20. Un-check Erase Destination checkbox.
  21. Click Restore, click Restore again, and then type your password.
The DVD will now copy onto your USB drive. It should take less than 10 minutes to complete depending on hard drive speed, DVD speed, etc...
STEP 2: INSTALL CHAMELEON BOOTLOADER TO USB DRIVE
Chameleon is a bootloader. It is open-source software that you load onto your hard drive that loads first and enables your computer to recognize and boot into an OS X Startup Disk or USB Installer. Think of it as a middle ground between your BIOS and your Operating System. In this step you will install Chameleon to your USB Installer drive.
  1. Download tonymacx86-snowleopard.zip.
  2. Open and place tonymacx86-snowleopard folder on the desktop.
  3. Open Apps folder
  4. Open PC EFI 10.1
  5. Select InstallDrive and click Continue.
  6. Click Install, and then type your password.
STEP 3: COPY NECESSARY FILES TO USB INSTALLER DRIVE
In this step, you will copy the boot file, DSDT.aml, and Extra folder from tonymacx86-snowleopard to Snow Leopard. You will also delete the 10.6.0 (10.0.0) Vanilla kernel and drop in the 10.6.0 (10.0.0) Qoopz Voodoo kernel. This is necessary because in OS X Snow Leopard 10.6.0-10.6.1, P55 based systems are not supported- the Qoopz kernel allows P55 support. The boot file is a modified version of Chameleon 2.0 RC3 (PC EFI v10.5!) which includes support for P55 motherboards and i5/i7 1156 processors. If you don’t install this file, the system clock will run too fast causing system-wide problems. The DSDT.aml is a modified version of the instructions that the computer sends to the Operating System which helps the OS recognize devices properly. The one included has fixes for CMOS reset, USB, and HD Audio.
The Extra folder contains com.apple.boot.plist, Extensions Folder, Extensions.mkext, and smbios.plist. apple.com.boot plist is a file which allows you to give Chameleon commands, select alternate kernels, give the system boot commands, etc… The smbios.plist contains information that identifies your computer to OS X. The Extensions Folder contains kexts (kernel extensions) that by default reside in System/Library/Extensions. Extensions.mkext is a cache of all of the kexts in your Extensions folder. At boot, the system loads the cache files located in /Extra/Extensions and /System/Library/Extensions. (/Extra/Extensions.mkext and /System/Library/Extensions.mkext) respectively.
  1. Open Applications/Utilities/Terminal
  2. Type: sudo rm /Volumes/InstallDrive/mach_kernel and type your password. (this deletes the stock Kernel)
  3. Type: sudo rm /Volumes/InstallDrive/boot and type your password. (this deletes the boot file installed from PC EFI 10.1)
  4. Close Terminal.
  5. Set up Windows as shown in the photo below.
  6. Click and drag boot, DSDT.aml, and Extra from tonymacx86-snowleopard to InstallDrive. (boot will become invisible when moved to Snow Leopard)
  7. Open Qoopz Voodoo kernel for 10.6.0 & 10.6.1 folder.
  8. Drag mach_kernel to InstallDrive.


STEP 4: PREPARE SNOW LEOPARD HARD DRIVE
Now you need to format your destination hard drive (Snow Leopard) to accept the installation by your InstallDrive. I strongly recommend using a SATA drive.
  1. Open Applications/Utilities/Disk Utility.
  2. Highlight the hard drive you want to use as the destination for your actual Snow Leopard Install in the left column.
  3. Click the Partition Tab.
  4. Click Volume Scheme- choose 1 Partition.
  5. Click Options…
  6. Select GUID Partition Table. Click OK.
  7. In the Name: field type: Snow Leopard
  8. In Format: field select Mac OS Extended (Journaled).
  9. Click Apply, then click Partition.
  10. Close Disk Utility.
  11. Right click on Snow Leopard in Finder or Desktop. Choose Get Info.
  12. In the lower right corner, click the lock icon open, type your password and un-check Ignore Ownership on this Volume checkbox. Click the lock icon closed.
  13. Shut down computer.
  14. Remove all hard drives except InstallDrive and Snow Leopard.
STEP 5: CHANGE BIOS SETTINGS
In order for your computer to boot directly into the external USB OS X Installer that we just created, you must change your BIOS settings in CMOS Setup Utility. The BIOS is set up by default to load any SATA or IDE drives before USB drives. Now is a good time to load the Optimized Defaults in the BIOS if you haven’t already, and then make the necessary changes as shown in the pictures.
  1. Turn on computer, and tap Delete key repeatedly- wait a few seconds for the computer to load CMOS Setup Utility.
  2. Click Load Optimized Defaults and accept.
  3. Click Advanced BIOS Features.
  4. Click Hard Drive Priority.
  5. Move USB Drive to top of list by highlighting it and hitting PAGE UP.
  6. Press Escape to get back to Menu.
  7. Match your settings to the pictures below.
  8. Click Save & Exit Setup and accept.


STEP 6: BOOT FROM USB DRIVE AND INSTALL OS X
Upon this restart, the USB Installer will boot using Chameleon boot loader. You should see the PC EFI v10.5 logo, the InstallerDrive and a blue countdown ribbon. It will boot on it’s own- you don’t need to do anything. The com.apple.boot.plist in /Extra contains the kernel flag –v which allows you to watch as the system loads the files that run OS X. If you want to view an apple logo with a spinning wheel, you can remove it later. It is easier to see what’s wrong if you watch the boot sequence.
  1. Follow the steps of the OS X Installer to install OS X to Snow Leopard.
  2. After the installation is finished, don’t restart. Turn the power button off without shutting down.
  3. Remove USB InstallDrive and turn on computer.
STEP 6.5: ALTERNATE METHOD (OPTIONAL)
If you used a Mac laptop & external enclosure to prepare the InstallDrive, and do not have an existing OS X install on your P55 machine, you may find the following alternate method easier. Instead of booting into an existing install to copy the mach_kernel, you can use the OS X Installer's Terminal to copy the kernel to Snow Leopard.
  1. Boot back into InstallDrive with Snow Leopard attached.
  2. Go to Utilities/Terminal
  3. Type: rm /Volumes/Snow\ Leopard/mach_kernel
  4. Type: cp /mach_kernel /Volumes/Snow\ Leopard/
  5. Reboot
  6. Boot back into InstallDrive, then pause Chameleon countdown and select Snow Leopard
  7. Proceed to STEP 9, then install Chameleon, /Extra, boot, & DSDT.aml following STEP 7 & 8 and the rest of the guide directly from Snow Leopard installation.
STEP 7: INSTALL CHAMELEON TO SNOW LEOPARD DRIVE
After installing, the computer will restart. Boot into your working install to replace files and install Chameleon to your Snow Leopard hard drive. This is the exact thing you did to the USB Installer drive earlier. In this step you will install Chameleon to your Snow Leopard hard drive.
  1. Boot back into your existing OS X Installation.
  2. Open Apps folder
  3. Open PC EFI 10.1
  4. Click Continue, then Change Install Location…
  5. Select Snow Leopard and click Continue.
  6. Click Install, and then type your password.
STEP 8: COPY NECESSARY FILES TO SNOW LEOPARD DRIVE
In this step, you will copy the boot file, DSDT.aml, and Extra folder from tonymacx86-snowleopard to Snow Leopard. You will also delete the 10.6.0 (10.0.0) Vanilla kernel and drop in the 10.6.0 (10.0.0) Qoopz kernel.
  1. Open Applications/Utilities/Terminal
  2. Type: sudo rm /Volumes/Snow Leopard/mach_kernel and type your password. (this deletes the stock Kernel)
  3. Close Terminal.
  4. Set up Windows as shown in the photo.
  5. In Snow Leopard, drag Extra to trash. Type your password.
  6. Click and drag boot, DSDT.aml, and Extra from tonymacx86-snowleopard to Snow Leopard.
  7. Open Qoopz Voodoo kernel for 10.6.0 & 10.6.1 folder
  8. Drag mach_kernel to Snow Leopard
STEP 9: FIRST BOOT
The first boot of your new Snow Leopard install will show you a video and then lead you through a standard OS X setup routine for a new Mac.
  1. Complete the OS X setup routine.
  2. When you finally get to the desktop, restart the computer. This helps set initial boot caches.
STEP 10: INSTALL ADDITIONAL KEXTS TO SYSTEM/LIBRARY/EXTENSIONS
There are a few kexts that you can’t use in /Extra/Extensions. These include Ethernet kexts. Also, you’ll need to create new cache files any time you remove or replace kexts. There are a few invaluable programs to allow you to do these tasks effortlessly. They are Kext Utility and Kext Helper b7. You can do all of the things in Terminal, but these apps make it easy and foolproof.
Open tonymacx86-snowleopard Apps folder.
  1. Drag Kext Utility and Kext Helper b7 to your Applications folder.
  2. Open Kext Helper b7.
  3. Drag RealtekR1000SL.kext (or Intel82566MM.kext if you have an Intel Motherboard) from System – Library – Extensions into Kext Helper b7.
  4. Type your password and click EASY INSTALL.
  5. Close Kext Helper b7.
  6. Open Snow Leopard drive.
  7. Drag /Extra/Extensions folder onto Kext Utility application. (This will repair permissions on the folder, backup your cache file, and replace cache file with an updated one.)
  8. Drag /System/Library/Extensions folder onto Kext Utility application.
  9. Open Applications/Utilities/Disk Utility
  10. Highlight Snow Leopard in the left column.
  11. Click Repair Permissions.
  12. Restart computer.
STEP 11: UPDATE TO 10.6.2
Upon the release of Mac OS X Snow Leopard 10.6.2, and the 27" Intel Core i5 and i7 iMacs, OS X Snow Leopard supports P55 based systems. This means that you can update without worrying about putting the Qoopz kernel back in. The update will install the 10.2.0 Vanilla Kernel, as well as a host of security and stability fixes. Details are available on Apple’s website.
  1. Download the Mac OS X 10.6.2 Combo Update here:
  2. http://www.apple.com/downloads/macosx/apple/macosx_updates/macosxv1062updatecombo.html
  3. Drag your /System/Library/Extensions folder to the desktop. You may need some of the 10.6.0 Extensions later. It’s always good to have a backup before any ‘point’ system update.
  4. Right click and rename the folder 10.6.0 Extensions.
  5. Mount MacOSXUpdCombo10.6.2.dmg
  6. Install MacOSXUpdCombo10.6.2.pkg
OPTIONAL INSTALLS:
The following step is optional- you may now be finished!

STEP 12: ENABLE QUARTZ EXTREME AND CORE IMAGE (QE/CI)
This step is necessary only if you don't have the full power of your graphics card already. By default, the com.apple.boot.plist has GraphicsEnabler=Yes selected, and should work for most cards. You can test if you have QE/CI enabled by pressing F12 (Dashboard) and trying to add a widget. If you see ripples, you have QE/CI enabled.
This step allows OS X to fully recognize and enable the power of your graphics card, like a driver. If you have an nVidia graphics card, you can also use NVEnabler 64.kext which is located on the tonymacx86-snowleopard folder in System-Library-Extensions. This kext is known to solve issues with TV-out.
  1. Open tonymacx86-snowleopard.
  2. Drag NVEnabler 64.kext from System – Library – Extensions into Kext Helper b7.
  3. Type your password and click EASY INSTALL.
  4. Close Kext Helper b7.
  5. Open Snow Leopard drive.
  6. Drag /Extra/Extensions folder onto Kext Utility application.
  7. Drag /System/Library/Extensions folder onto Kext Utility application.
  8. Open Extra folder
  9. Drag com.apple.boot.plist to desktop.
  10. Double click to open in TextEdit
  11. Remove the GraphicsEnabler=yes line.
  12. Drag the edited com.apple.boot.plist back to Extra folder.
  13. Open Applications/Utilities/Disk Utility
  14. Highlight Snow Leopard in the left column.
  15. Click Repair Permissions.
  16. Restart computer.
YOU’RE DONE!
One final note. This is how I got my system working. If I find a way without replacing any old kexts, I’ll certainly let you know. I’m working on enabling sleep for this motherboard, and I will post a method if I come across a solution.

If you’re having issues with any component, most likely graphics if you have an ATI card, know that there are many ways to enable graphics. Most likely there is a solution that can be found. I may be able to help you if you post your issue in the comments to this post. Thanks for reading and I hope it worked for you! Special thanks goes out to the entire OSx86 Hackintosh community! This guide was cobbled together from various sources- I did not invent this method, and do not wish to take any credit beyond putting it into plain English. ;)

-tonymacx86

PS: If you want to enable the Apple Boot Screen on startup, read this post:
http://tonymacx86.blogspot.com/2009/11/enable-apple-boot-screen.html

EDIT #1 (2009-11-17): tonymacx86-snowleopard.zip now contains a modified version of PC EFI v10.5 for P55 Boards! This means ATI users can now use GraphicsEnabler=Yes flag in com.apple.boot.plist. I updated the com.apple.boot.plist to include this flag by default. Therefore, you may not have to use NVEnabler 64.kext anymore either. I made a few changes to the guide accordingly. Unfortunately I don't have an ATI card to test. I believe both nVidia and ATI cards will now be fully enabled by default by using this guide. For further ATI solutions, check out this post on netkas' blog.

EDIT #2 (2009-12-07): If you're having trouble booting, it may be the 10.6.0 Qoopz kernel. Replace each reference of the Qoopz kernel in the above guide with the Vanilla 10.6.2 kernel. Also, I added an optional STEP 6.5 specifically for users who do not have an existing Hackintosh install on their P55. After installation, instead of booting into an existing install to copy the mach_kernel, you can use the OS X Installer's Terminal to copy the kernel to Snow Leopard.

EDIT #3 (2010-01-23): Removed the following section due to new edits of the GA-P55M-UD2 DSDT. The updated version is now included by default in tonymacx86-snowleopard.zip.

STEP 12: REPLACE FILES AND REBOOT
This step is necessary if using the LegacyHDA_ALC888B.kext in the Extra folder for audio. You must replace the 10.6.2 AppleHDA.kext with the one from 10.6.1. Because this guide skipped 10.6.1, I included it in tonymacx86-snowleopard. You may use something else such as VoodooHDA.kext, and you’ll never have to replace anything, but I prefer this one as it maps the ins and outs directly for the UD2 motherboard. **Most likely the kext will be updated and this step will become unnecessary. (2010-01-23)

  1. Open tonymacx86-snowleopard.
  2. Drag AppleHDA.kext from System – Library – Extensions into Kext Helper b7.
  3. Type your password and click EASY INSTALL.
  4. Close Kext Helper b7.
  5. Open Snow Leopard drive.
  6. Drag /Extra/Extensions folder onto Kext Utility application.
  7. Drag /System/Library/Extensions folder onto Kext Utility application.
  8. Open Applications/Utilities/Disk Utility
  9. Highlight Snow Leopard in the left column.
  10. Click Repair Permissions.
  11. Restart computer.

For discussions on this and other topics, register today at tonymacx86.com!